By Michael Brady, Newport Rigging Group
As fall approaches and much of the Northeast fleet begins to think about winter hibernation, NRG has a few thoughts to share about your rig.
Your mast is a machine, not a monument. You can’t just set it and forget it (apologies to Ronco). The forces and stresses acting on your rig are peaking while sailing, but they don’t stop when you’re not. Motoring, riding at anchor, on a mooring, berthed in a marina, and even being dry-stored with the mast up – all these (in descending order) cause load cycles to pass through the mast, standing rigging, and even running rigging items like boom topping lifts. All the while, galvanic corrosion and stray current are working their dark magic on the unhappy bedfellows that comprise the materials your rig is made of. Very often, your mast and rigging have more “miles on it” than you think. Allow for this as you schedule inspections, maintenance, and preventative replacements.
This brings us to the concept of rigging being “proven.” We hear this now and again as counterpoint to the argument above. “Why should I change it? It’s working great! You’re just trying to sell me something.” All that we can really say in reply is that the engine oil in your car and that carton of eggnog in the fridge since Christmas are also proven, but you wouldn’t expect to use either of those forever. Things deteriorate over time. Even though they still look like rigging, Pennzoil or eggnog, it doesn’t mean you should keep on using them. Have a good think about just how many years ago you last changed your rigging. Consider what it’s been through, both when you’re using your boat AND when you’re NOT. Rigging is costly, and it’s never easy to say whether you “really needed” to change it. You’ll only ever have certainty if you don’t replace rigging items and the worst occurs. As the boat owner the choice is yours. Choose wisely…
Lubricate – don’t worry about attracting dirt! This is one of our many unofficial rigging mottos (most can’t be printed in a family publication). If you buy our approach that a rig is a machine, you’ll likely agree that machines work better and last longer when friction, binding, wear, and corrosion are minimized. We lubricate pins, toggles, turnbuckle threads, rigging terminations, electrical connections, machine screws, winch parts, etc. Generally, unless it’s something that will be actually worsened (e.g. plastic bearings in a block or furler), we give it all a good schmear. Ninety per cent of the battle is using anything at all, as long as it’s slippery, waterproof, and won’t chemically attack the materials it’s tasked to protect. We of course are the Grease Police and have our favorites!. People worry about attracting dirt. We do not! Thirty seconds with a rag beats thirty minutes with a torch, hammer, ViseGrips, etc. on a seized part. We’ve seen A LOT of rigs – most look good from even a relatively close distance. None of them would you eat food off of. A little bit of dusty grease around a fitting won’t change anything.

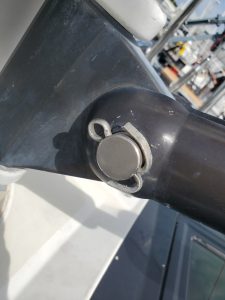
Don’t be an “anchorman” (or woman)! Over-bending split pins won’t make clevis pins any less inclined to fall out, and the shop time for a pro rigger to straighten and remove your handiwork will cost you deep in the purse. © newportrigginggroup.com
Articulation is the solution to “fatigulation.” A failed catchphrase to be sure, but articulation of rigging – that is, no bent wire nor rod – is another key element to long-lived, safe rigging. The only place a stay should follow a “bent” path is passing through a spreader tip. Allowing standing rigging to align along its load-path is the goal, and toggles are the way to do it. They are absolutely recommended for any forward stay that flies a sail, as the bowstring effect of the sail’s loading causes the stay to lead a in a parabolic curve. Toggles at both ends allow for this curve without sharp bends in the wire or rod.
Spreader angle above horizontal is known as dihedral. This describes how much under 90° the angle between the mast wall and the upper surface of the spreader is. Unless you have multiple sets of spreaders that are exactly the same length, you want to have this up-angle. Your spreader(s) should neatly bisect the plane of the vertical shroud running through it. This puts the spreader in pure compression and projects the shrouds the maximum amount outboard, better supporting the mast. As the source of the vertical shroud above a given spreader is nearly always inboard of it, the spreader dihedral angle will be “up” (<90°).
This is especially important if your rig has a single set of spreaders, as the upper section of shroud is coming from the mast wall. Be sure your spreaders bisect, and are evenly positioned port vs starboard. Getting a good distance directly astern (backstay aligned with centerline of mast) is the only good way to sight this. If the manner in which the spreaders fasten to the mast wall allows the dihedral angle to change (i.e. the tip of the spreader can travel up and down the shroud), consider a method to keep them in place at the correct position. This can include wire seizing, cable clamps, etc. installed on the shroud above and below the spreader tip. It doesn’t need to bear much load, just keep the spreader in position on the leeward side when the rigging loses tension.
Don’t tighten your headstay to tighten your headstay! We know this sounds crazy but it’s true, especially for those of you with jib furlers. Next time you’re motoring through the harbor or walking the docks, take a look at your neighbors’ masts. Next, look at yours! Really get yourself athwartships (so the side vertical shrouds line up with the center of the mast tube, or if the spreaders are swept, so that the two vertical shrouds overlap). Now you’re directly athwartships, and the angles you see are real, as though you’re looking at the sailplan drawing of the boat. Is the mast angled aft? Is the masthead further aft of where the mast meets the deck? A surprising number are not, and 90% of the time it’s the result of shortening the headstay to tighten the headstay, often because the furler is rattling. This messes with rake angle, which is the single most important tuning feature that will prevent your sailboat from performing the way the designer intended.
We treat the intended headstay length as the starting point of our tune, then address the tension in this stay from a number of other areas in the rig. How to tackle these issues correctly would be another article all on its own, but please resist the urge to just shorten your headstay in order to tighten it. Rake is necessary! Weather helm sailing upwind is good – it’s how you get places the wind is blowing out of!
Belay that pirate ship anchor! Don’t over-spread your split (cotter) pins. No added security comes once past 10-15° of splay. If you can’t push the pin out with your fingertip, it cannot come out on its own. Bending the ends around a clevis pin makes removal take ages and rules out reuse of the split pin. Concerned about snags? The legs can be snipped short with any cutting pliers rated for hardened wire. Put a dab of silicone caulk on the ends if you must. DIYers: Your time is too valuable. Boatyard and rigging labor is expensive. Time spent spreading and straightening these art projects just isn’t worth it.

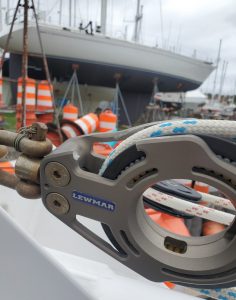
Overhoisting the spinnaker halyard jams the shackle into the sheave or in this case a floating halyard block…which ultimately breaks!
Protect your mast from your spin halyard shackle. This is our #1 recommendation following rig checks for boats 40 to 140 feet. Any halyard that will fly a sail without a strictly defined luff length (i.e. not the main or jib/genoa) needs a sacrificial piece to protect the mast from overhoisting the shackle into the sheave box. It can be any kind of plastic ball or disk. We’ve seen skateboard wheels, drilled-out hockey pucks, chunks cut out of a cutting board with a hole saw, etc. Anything is better than the gouged sheave boxes and spread-apart block cheeks we see when nothing is in place. ■
Comprising Michael Brady, Chuck Brown, Peter Eagan and David Moffet, Newport Rigging Group is a full-service rigging shop with over 70 years of combined experience in spar and rigging sales and service, with locations in Newport and Portsmouth, RI. Log onto newportrigginggroup.com to learn more.


